Recently a friend sold me her old sewing machine after she decided that sewing was not the hobby for her. I had done some hand-sewing previously but this was my first decent machine. I spent some time surfing Pinterest and found a projects that combine my love of reading with my new hobby. These bookshelf quilts we’re not the easiest thing for a first-timer but I am nothing if not committed. So after doing plenty of research I decided to design my own from scratch. This is what the overall design came out pill look like to scale.
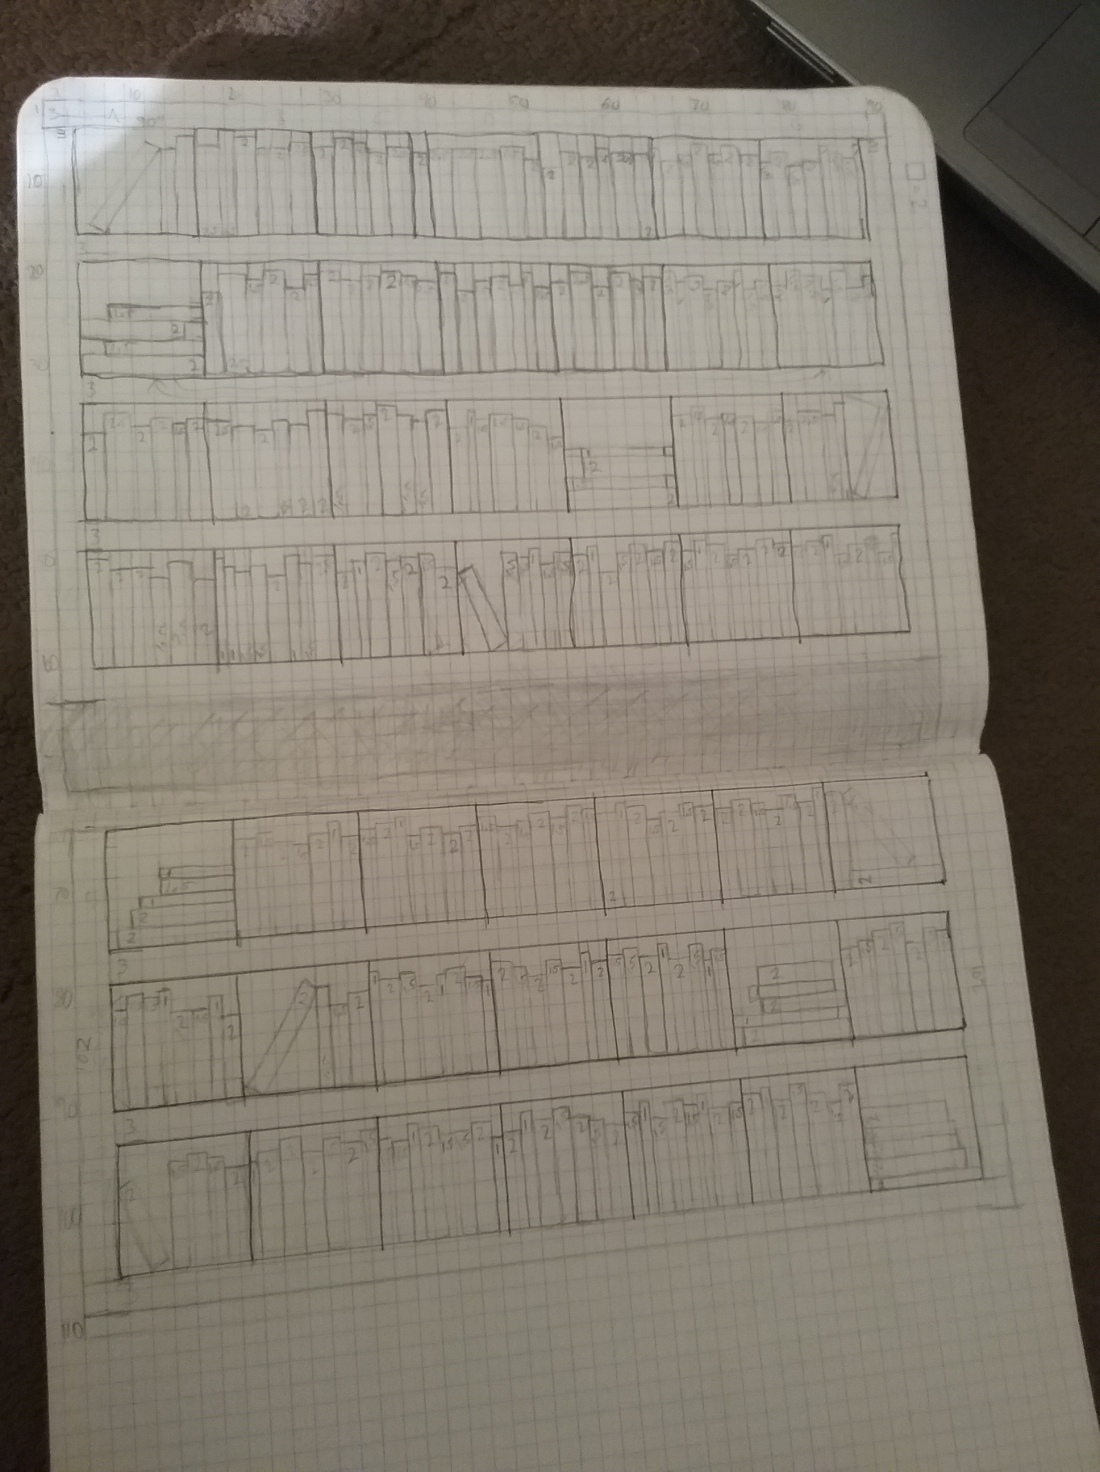
Once I had a design I had to do the hard part. You know when they say that you will need the math from school at some point in your life? Well it really came in handy here. I started with the size and shape of the “books” I wanted. I didn’t worry about colors or textures or patterns or Fabrics just yet. I just focused on size and layout. I broke the quilt down into blocks and designed each black on a printed out grid. Then I determined how big each rectangle was an added a half inch to each measurement for seam allowances. Once I had the whole quilt laid out I determined how many of each size rectangle I would need.


I cut all the strips in the sizes that I needed, focusing on getting a variety of colors in each size. All of my fabric material was from resale shops, old clothing, or just stuff I had lying around. I never went to a fabric store until the very end of this project. I kept a tally of all the strips in a little notebook.

Once I had all the strips I needed four books I cut long strips off an old sheet in a variety of widths for the background of the bookshelf. Every book strip got background strip of the corresponding with sewn onto the end and cut so that the total length of the new strip was 12 1/2 inches. Then those strip sewn into blocks. The blocks that were all straight books were quick to sew together but the leading books gave a little more challenge. I needed some books tilted to give it a more realistic look, but they certainly presented a challenge. Instead of sewing the background material on in strips it had to go on in blocks and then get trim down into a rectangle. If the book was leaning on another book they had to fit together just right. Again with the math. Several of these blocks had to be redone due to errors in calculation.


There were 49 blocks in total and once they were all done I laid them out in the pattern I intended them to be in originally and look to see where any of the colors or patterns clashed or were too close to one another. I did a little rearranging and realize that my blocks were not all straight across on top. I ended up trimming about a half inch off of every block so it was shorter than I intended but it worked out because the quilt ended up much larger than I intended anyways. Once all of the blocks were Square (or in my case rectangular) I sold them into straight rows.


Once the rows were as straight as I could make them, I caught some darker 4 inch strips from another old sheet and sewed them to the bottom of each row and an extra to the top of the first row.

Once the shelves were on I put on the side edges. This sounded fairly easy until I realized that all of my rose were not the same length. I had to do some creative cutting and edging to get all of my books to line up and it still is definitely not completely straight. Oh well. with all of the books, background, shelves, and orders on the quilt top was complete.

Unfortunately the quilt top was the least frustrating part of this project. I had to lay out the quilt top face down on my floor as smoothly as I could. Then I put a sheet of batting on top of it. I had to maneuver it a little because the not straight sides made it difficult to fit the batting correctly. I had decided to purchase the fabric that I needed for the back of a quilt from an actual fabric store. I calculated that I needed to cover an area that was 90 inches by 100 inches so I bought 6 yard of a material that was 46 inches wide. Despite of of my math, I didn’t calculate for the one thing that always happens, human error. I had enough length, but not enough width, so I had to use some of the material that I had used for the shelves to widen it. Again, I hadn’t made the straightest of lines, so the back isn’t the prettiest (which is probably why I got third place at my local county fair) but it’s finished and functional.

It ended up much larger than I intended, but I sewed together the 3 layers (face, batting, and backing) around each of the books, trimmed a bunch of threads, and added a binding made of the same material as the shelves. My machine locked up a few times in the process which involved a screwdriver and quite a bit of swearing, but no material was harmed in the quilting of this blanket. 😉 on to my next project!
