Blue Apron

I love to cook but deciding what to cook is the hardest part for me. When I got an email for $30 off my first order, I decided to give Blue apron, the meal delivery service a try for 1 week (2meals, 2 servings each) I went online, picked my meals and set my reminder to cancel it after that week if I didn’t really love it. (Otherwise it auto renews) I week later I got the email that it had shipped.

I was off the day of delivery so I waited to hear a knock, but around 6pm, when I still hadn’t heard anything, I went online to check the status. I found out that the box had been sitting on my porch, in the direct sunlight, in 85 degree wether for 6 hours! Not thrilled FedEx! But that was more on the delivery company than the providers.

Since it had been sitting out so long, I was in a hurry to get the items in the fridge, but basically they were in a thermal wrap inside a box. On the bottom was a large ice pack (95% melted), then the ingredient@, then another ice pack, then the recipes. The pasta and the steaks had completely thawed from frozen.

Since the box was shipped overnight from Texas to Wisconsin in the middle of summer, I think they did the best they could. The ice packs said they were reusable, but if you get 2 every week, how many ice packs do you really need?

The steaks were the only meat in my order. They seemed a little small and really bloody, but tasted good. I was a little frustrated when I cooked bother in the same pan for the same amount of time and one came out medium (minimal pick) and the other came out rare (very pink).

I liked that the meals came labeled as to what ingredient went with which meal as well as being listed on the recipe to make sure you had everything.

So I followed the instructed and shucked & carved my corn, sliced my zucchini and diced my garlic (They sent about double the amount of garlic needed) while boiling my pasta.

I got a little stressed with some of the multitasking thin the recipe, but there was enough time to get it all done. Once cooked, I combined everything according to instructions. It turn out well but definitely could have used more sauce/cream.

The recipe called for a based of ricotta and the pasta and veggie mixture on top. Unfortunately I did not feel like there was enough ricotta to meet the pasta, but it still tasted fine without. I ended up getting 2 full meals out of it and an extra 2 side dishes out of the remaining to eat with another meal.

Unfortunately there was a lot of plastic that went into 1 meal dividing up all the materials. I would rather have seen a recyclable or comparable packaging, especially since the items are not preserved for long.

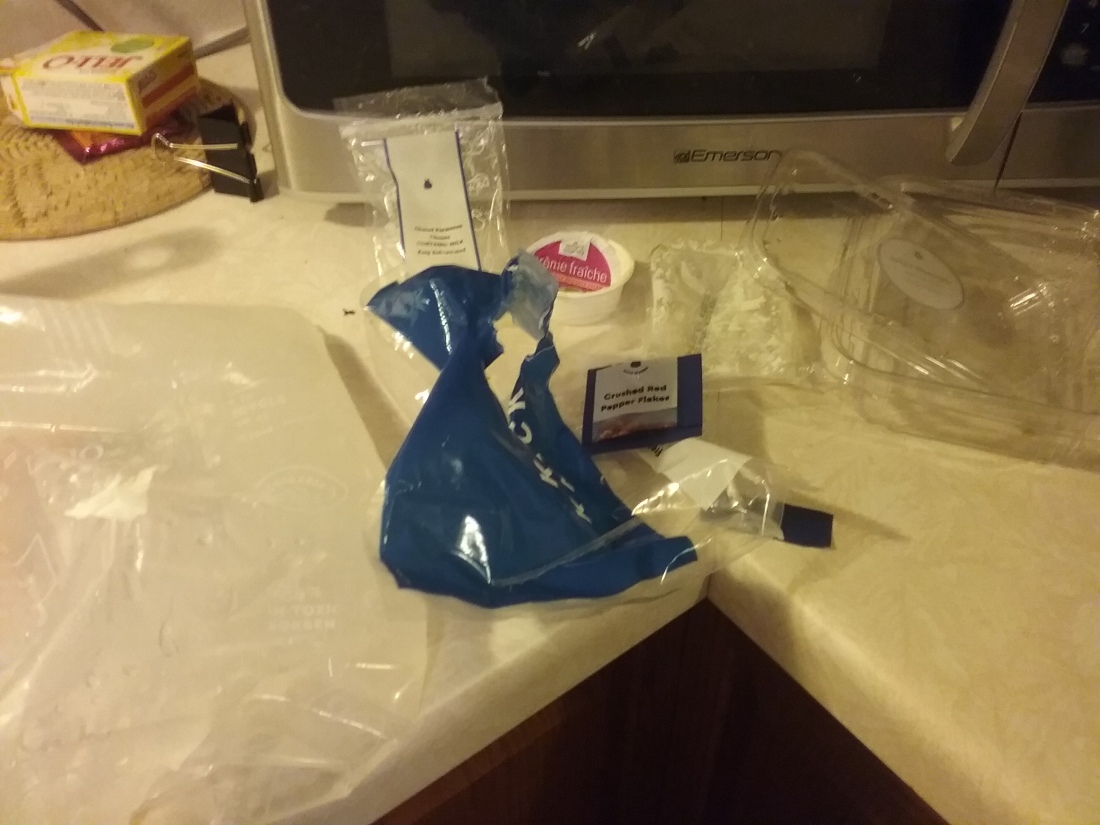
I also read the label on the ice pack which said 99% water. Well apparently that other 1% does not flush well. I ended up doing this to my sink trying to get it to drain out. It did go down eventually with a little help, but I definitely would not to that again.

In the end, the dishes did turn out very pretty and tasty, but I would not pay the $50 a week to get it again. The $17 that I paid with the coupon, maybe. But full price is just not worth it when you could get the recipe for free from them and buy the items at the grocery store for some much less.

Bookshelf quilt

Recently a friend sold me her old sewing machine after she decided that sewing was not the hobby for her. I had done some hand-sewing previously but this was my first decent machine. I spent some time surfing Pinterest and found a projects that combine my love of reading with my new hobby. These bookshelf quilts we’re not the easiest thing for a first-timer but I am nothing if not committed. So after doing plenty of research I decided to design my own from scratch. This is what the overall design came out pill look like to scale.

Once I had a design I had to do the hard part. You know when they say that you will need the math from school at some point in your life? Well it really came in handy here. I started with the size and shape of the “books” I wanted. I didn’t worry about colors or textures or patterns or Fabrics just yet. I just focused on size and layout. I broke the quilt down into blocks and designed each black on a printed out grid. Then I determined how big each rectangle was an added a half inch to each measurement for seam allowances. Once I had the whole quilt laid out I determined how many of each size rectangle I would need.

I cut all the strips in the sizes that I needed, focusing on getting a variety of colors in each size. All of my fabric material was from resale shops, old clothing, or just stuff I had lying around. I never went to a fabric store until the very end of this project. I kept a tally of all the strips in a little notebook.

Once I had all the strips I needed four books I cut long strips off an old sheet in a variety of widths for the background of the bookshelf. Every book strip got background strip of the corresponding with sewn onto the end and cut so that the total length of the new strip was 12 1/2 inches. Then those strip sewn into blocks. The blocks that were all straight books were quick to sew together but the leading books gave a little more challenge. I needed some books tilted to give it a more realistic look, but they certainly presented a challenge. Instead of sewing the background material on in strips it had to go on in blocks and then get trim down into a rectangle. If the book was leaning on another book they had to fit together just right. Again with the math. Several of these blocks had to be redone due to errors in calculation.

There were 49 blocks in total and once they were all done I laid them out in the pattern I intended them to be in originally and look to see where any of the colors or patterns clashed or were too close to one another. I did a little rearranging and realize that my blocks were not all straight across on top. I ended up trimming about a half inch off of every block so it was shorter than I intended but it worked out because the quilt ended up much larger than I intended anyways. Once all of the blocks were Square (or in my case rectangular) I sold them into straight rows.

Once the rows were as straight as I could make them, I caught some darker 4 inch strips from another old sheet and sewed them to the bottom of each row and an extra to the top of the first row.

Once the shelves were on I put on the side edges. This sounded fairly easy until I realized that all of my rose were not the same length. I had to do some creative cutting and edging to get all of my books to line up and it still is definitely not completely straight. Oh well. with all of the books, background, shelves, and orders on the quilt top was complete.

Unfortunately the quilt top was the least frustrating part of this project. I had to lay out the quilt top face down on my floor as smoothly as I could. Then I put a sheet of batting on top of it. I had to maneuver it a little because the not straight sides made it difficult to fit the batting correctly. I had decided to purchase the fabric that I needed for the back of a quilt from an actual fabric store. I calculated that I needed to cover an area that was 90 inches by 100 inches so I bought 6 yard of a material that was 46 inches wide. Despite of of my math, I didn’t calculate for the one thing that always happens, human error. I had enough length, but not enough width, so I had to use some of the material that I had used for the shelves to widen it. Again, I hadn’t made the straightest of lines, so the back isn’t the prettiest (which is probably why I got third place at my local county fair) but it’s finished and functional.

It ended up much larger than I intended, but I sewed together the 3 layers (face, batting, and backing) around each of the books, trimmed a bunch of threads, and added a binding made of the same material as the shelves. My machine locked up a few times in the process which involved a screwdriver and quite a bit of swearing, but no material was harmed in the quilting of this blanket. 😉 on to my next project!

Garlic Parmesan Potato Strings

Last week I tried this new recipe. I like garlic I like parmesan and I love potatoes so I thought it was worth a try. I used my spiralizer that I bought about a year ago on Amazon to turn some potatoes into noodles.

Then I follow the instructions for seasoning. My oven cooks a little hot so I turned it down by about 25 degrees.

I probably should not have left them in the oven quite as long as I did because they got a little bit too crispy for my taste.

I added the parmesan and ate it. I was not wowed by the taste but it certainly made my house smell yummy.

Memory bear

So a friend’s mother passed away recently and she wanted to give her younger brother something to remember her by. I mentioned to idea of a memory bear, something made from the clothing of a loved one. My friend really like the idea and wanted to give it to her brother at his birthday or graduation. She also tasked me with making one for her uncle, who was her mom’s twin.

I found this pattern on Pinterest and set about making the bear. My first problem came when trying to print. They print out was not designed for 8.5×11 paper. I had a choice between risking distortion by saying “fit to page” or I had to tape an extension piece on and trace the remainder (again risking some distortion). I ended up just doing the extension.

I cut the pieces out from the paper, traced them with the blue, wash-out side of my marking pen I bought last year. I’m grateful that seam allowances were included so I didn’t have to do as much math. I just laid the pieces out to use the least amount of fabric but it was a little confusing reading the directions when some pieces needed to be cut in “reverse”. Luckily the fabric I was using was pretty reversible.

After cutting out all the pieces, I discovered that it would be less complicated to hand-stitch than try to do all the curves and gaps, so I doubled up my thread and set to stitching. The pattern was fairly easy to follow and the pieces fit together well.

Attaching the arms and legs and head was a little tricky because things were fairly loose and floppy but I managed after a few rounds. After the limbs were attached I stuffed everything and then attach the head according to directions.

I used buttons for eyes since I did not have any glass bear eyes just laying around but it turned out fine and once I stitched a mouth and closed up all the seams it was done. But the bear was more elongated than I liked so when I went to do the second one I trimmed the length of the arms and torso down so it wasn’t as tall.

Round two I took more care about the direction of the fabric and what colors I placed where. I ended up using two long sleeve shirts to make the pieces for two bears. I only needed the material from the sleeves, so I didn’t use any of the main shirt except the buttons.

I plan to attach a sign with this quote (obviously with the signature changed) and give it to her this week.

First!

So eventually I would like to use this site to publish the crafts and recipes that I have tried both successfully and unsuccessfully so that you can learn from my mistakes. However right now it’s the end of the school year and my goal is basically to survive. Therefore in the meantime please enjoy this picture walkthrough of how I made a quilt for the first time.

First it is a matter of gathering and cutting Fabrics. I had some random ones I picked up from thrift stores. I cut an estimate of the number I would need into 4 and 1/2 by 4 and 1/2 squares using a cardboard template.

Once all of the squares work but I laid them all out to determine a design.

Then I sorted the squares into blocks and rows. I sewed them together first into rows and then into blocks. I did not have an iron so to flatten my seams I used a hair straightener. Did I mention I did not use a sewing machine for any part of this?

After assembling all of the blocks I sewed them together in rows. There were a couple I had to disassemble because colors were not in the correct places. Once the rows were together I connected the rows. Finally I had a quilt top. Then came the quilting. I found an old sheet that I used for backing and sew together a couple pieces of batting for the inside.

I used some colorful embroidery thread to quilt the top and attach it to the bottom and then trimmed and fold it over the sides for a finished look.

It took almost an entire year, but I pieced and quilted the entire queen sized blanket with no machines and no help other than online tutorials. This tutorial in particular was the most help.